درس رسم تلفاز في الفوتوشوب
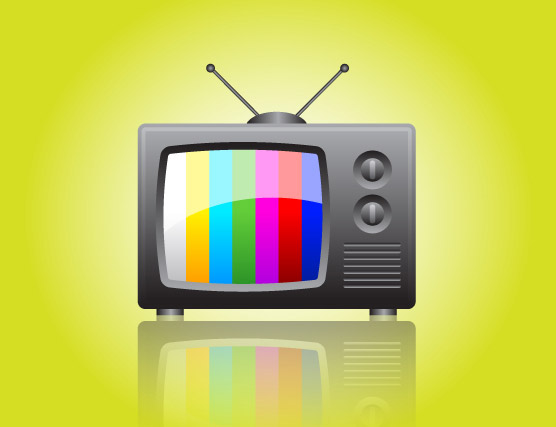
هذا الشكل النهائي
Here is a preview of the final image we will be working through!
Step 1
Create a
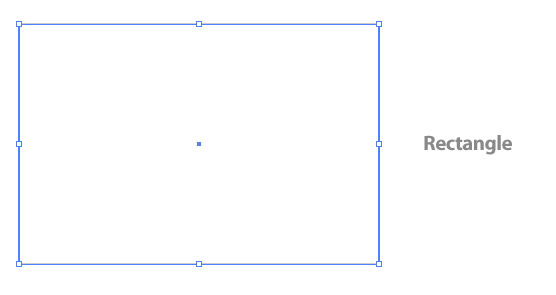
new document and create a 360 px wide by 240 px tall rectangle with the Rectangle tool (M).
الخطوة 1
إنشاء عمل جديد وإنشاء 360 px wide by 240 px
نرسم مستطيل طويل القامة مع أداة Rectangle tool (M
Step 2
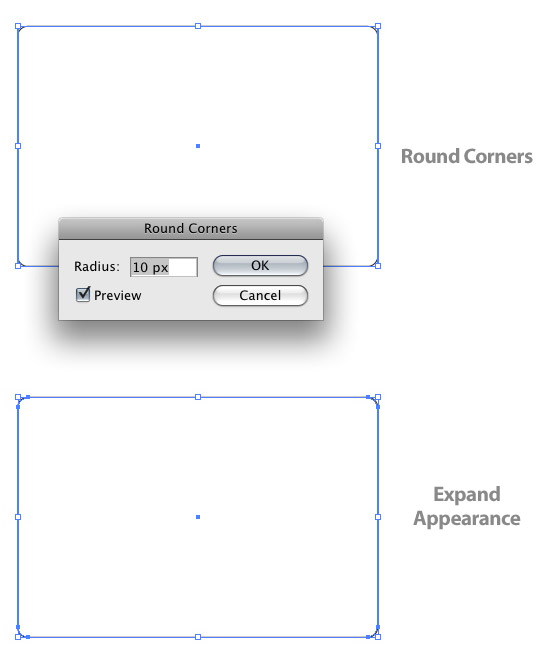
With the rectangle selected, go Effect > Stylize > Round Corners. In the Round Corners dialog, change the radius to 10 px and press OK. Next, expand the effect by going Object > Expand Appearance.
الخطوة الثانية
مع المستطيل المحدد ، انتقل الى Effect > Stylize > Round Corners
. ستضهر صفحة صغيرة اختر القيمة 10 واضغط على موافق. المقبل ، وتوسيع نطاق التأثير من خلال الذهاب الى Object > Expand Appearance
.
Step 3
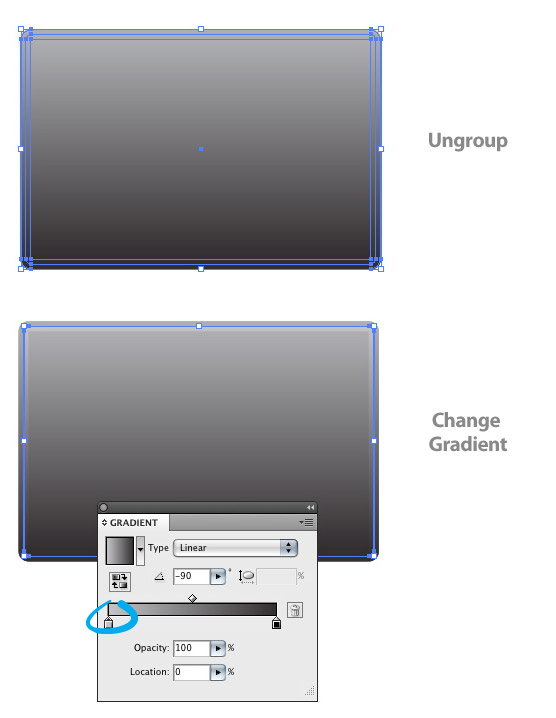
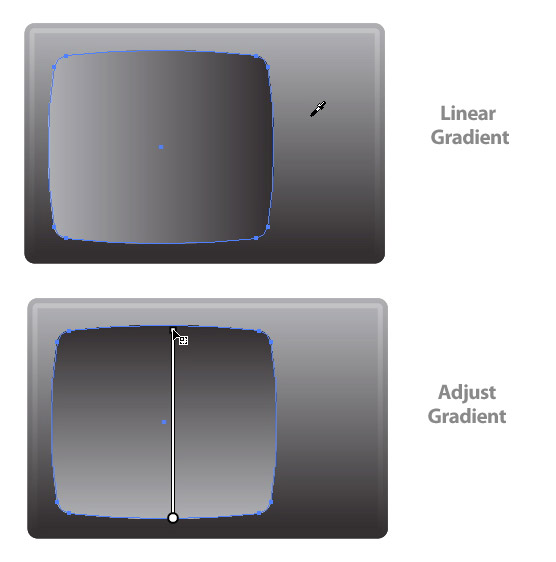
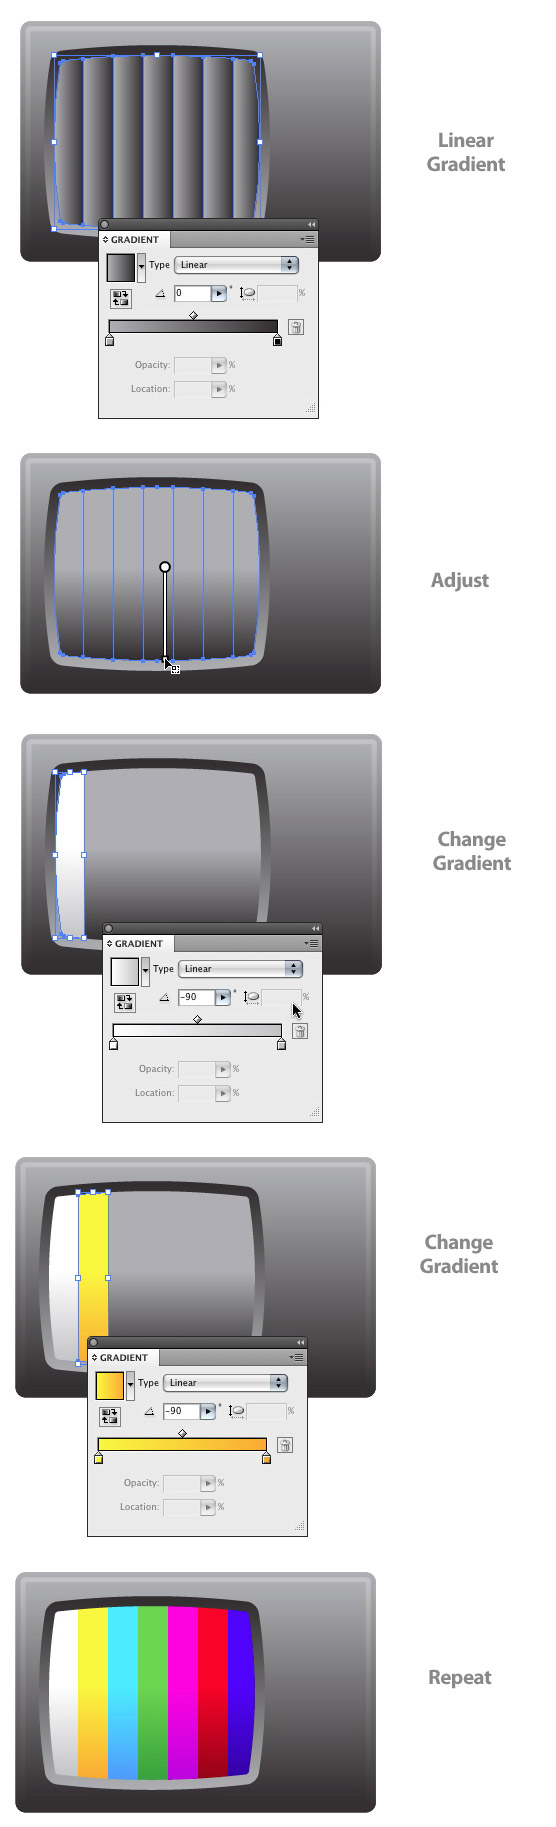
Fill the rectangle with a Linear Gradient from the Gradient panel. Change the first Color Stop in the gradient to a grey color and the second Color Stop to black. With the Gradient tool adjust the gradient by clicking and dragging from the top of the rectangle to the bottom.
الخطوة 3
تعبئة المستطيل مع الانحدار الخطي Linear Gradient
من لوحة التدرج. تغيير لون الأول في الانحدار إلى لون رمادي والثاني اللون إلى الأسود. مع أداة Gradient tool
الانحدار من خلال النقر وجره من الجزء العلوي من المستطيل إلى أسفل.

Step 4
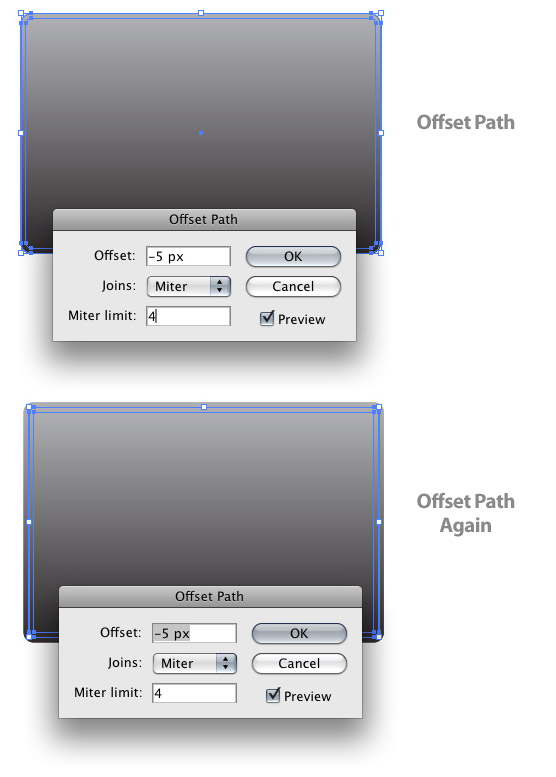
With the rectangle still selected, go Object > Path > Offset Path. In the Offset dialog, change the Offset to -5 px. Select the offset path, go Object > Path > Offset Path, and change the Offset to -5px. Now you should have a total of three rectangles.
الخطوة 4
مع المستطيل المحدد لا يزال محدد، انتقل الى Object > Path > Offset Path
. في Offset dialog
،غيير Offset
إلى -5 px
. حدد اختر offset path
، انتقل الى Object > Path > Offset Path
، وغيير Offset
إلى 5px. الآن يجب أن يكون لديك ما مجموعه ثلاثة مستطيلات. three rectangles
Step 5
Select the rectangles and Ungroup them by going Object > Ungroup (Command + Shift + G). Next, select the first offset path and change the first Color Stop in the gradient to a slightly lighter grey than the original grey.
الخطوة 5
حدد rectangles
وفك التجميع لهم بالذهاب الى Object > Ungroup (Command + Shift + G)
). وبعد ذلك ، حدد المسار offset path
وغيير لون الأول في الانحدار إلى رمادي أخف قليلا من اللون الرمادي الأصلي.
.
Step 6
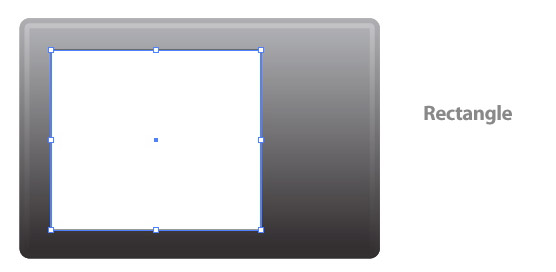
Create a 210 px wide by 180 px tall rectangle over the left side of the first rectangle.
الخطوة 6
إنشاء 210 px wide by 180 px tall rectangle
على الجانب الأيسر من المستطيل الأول.
Step 7
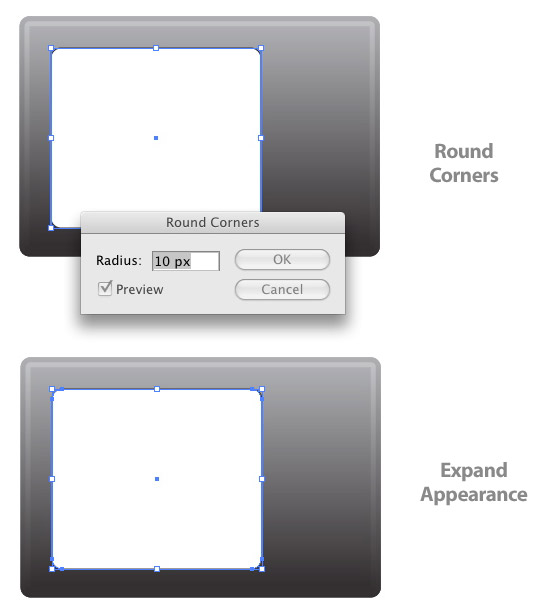
With the new rectangle selected, go Effect > Stylize > Round Corners. In the Round Corners dialog, change the radius to 10 px and press OK. Next, expand the effect by going Object > Expand Appearance.
الخطوة 7مع المستطيل المحدد الجديدة ، انتقل الى Effect > Stylize > Round Corners
. في مربع Round Corners dialog
،غيير نصف قطرها إلى 10 px
واضغط على موافق. بعدها ،توسيع نطاق التأثير من خلال الذهاب الى Object > Expand Appearance
Step 8
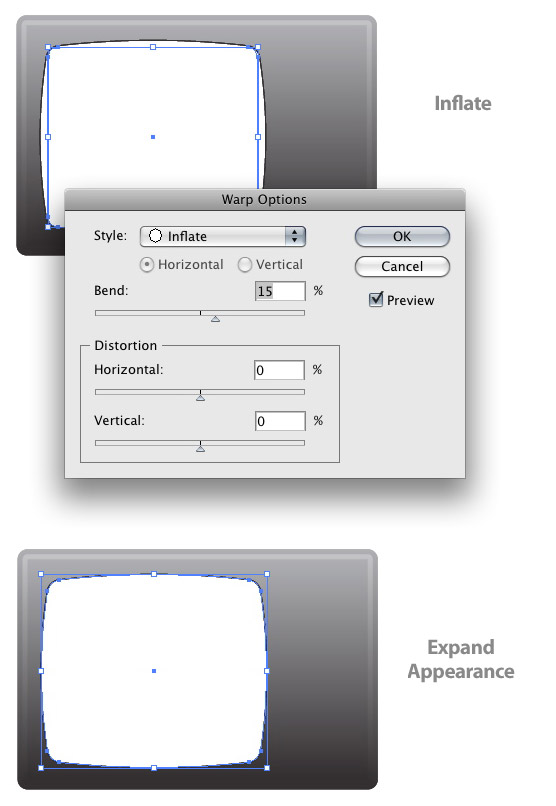
With the rectangle still selected, go Effect > Warp > Inflate. In the Warp Options dialog, change the Bend percent to 15. Next, go Object > Expand Appearance.
الخطوة 8
المستطيل المحدد لا يزال محدد، انتقل الى Effect > Warp > Inflate.
. في مربع Warp Options dialog,
، غيير في المئة إلى 15 بيند. بعدها ، انتقل الى Object > Expand Appearance.
Step 9
Fill the rectangle with the same Linear Gradient as the main rectangle. You can easilly do this by sampling the original gradient with the Eyedropper tool. Next, adjust the gradient by clicking and dragging from the bottom to the top of the rectangle so the light part of the gradient is at the bottom of the rectangle.
الخطوة 9
تعبئة المستطيل مع التدرج الخطي نفس المستطيل الرئيسية. يمكنك القيام بذلك عن طريق أخذ العينات easilly original gradient
مع أداة Eyedropper tool.
.بعدها اضبط التدرج بالنقر والسحب من أسفل إلى أعلى المستطيل ذلك الجزءlight part
هو في الجزء السفلي من المستطيل.
.
Step 10
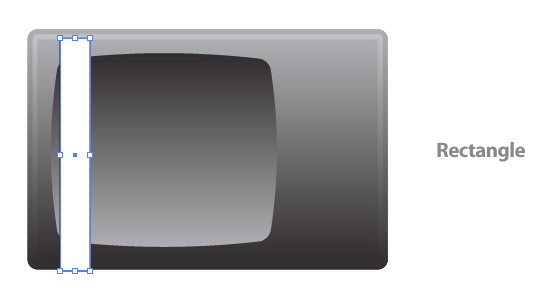
Draw a rectangle that is 30 px wide and tall enough to cover the television screen (the inflated shape just created) and place it on the inside left side.
الخطوة 10
رسم مستطيل هو30 px wide
نطاق واسع وطويل بما يكفي لتغطية شاشة التلفزيون tall enough
(على شكل تضخم أنشأته للتو) ووضعه على الجانب الأيسر في الداخل.
.
Step 11
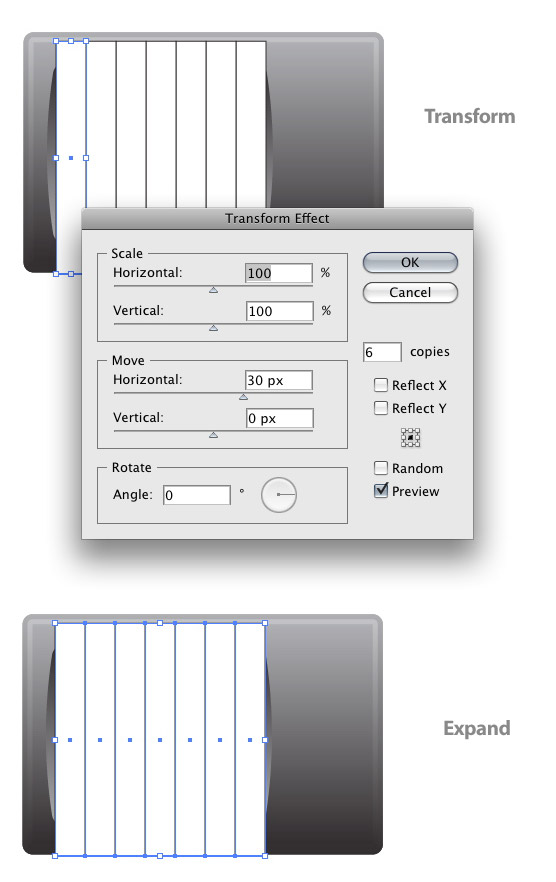
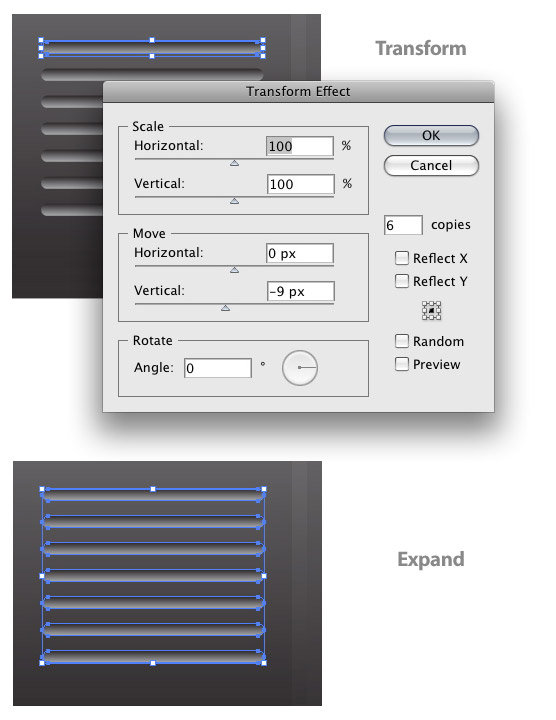
With the new rectangle selected go Effect > Distort & Transform > Transform. In the Transform Effect dialog, change the copies to 6 and the Horizontal to 30 px. Next, go Object > Expand Appearance
.
الخطوة 11
مع تحديد المستطيل الجديد اذهب الى Effect > Distort & Transform > Transform.
. في مربعTransform Effect dialog
وغيير النسخ إلى (6) والأفقية إلى 30 px
. بعدها ، انتقل الى Object > Expand Appearance
Step 12
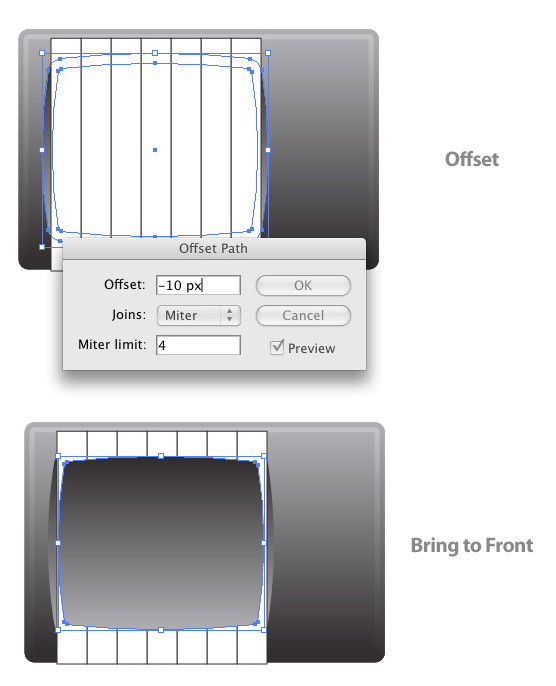
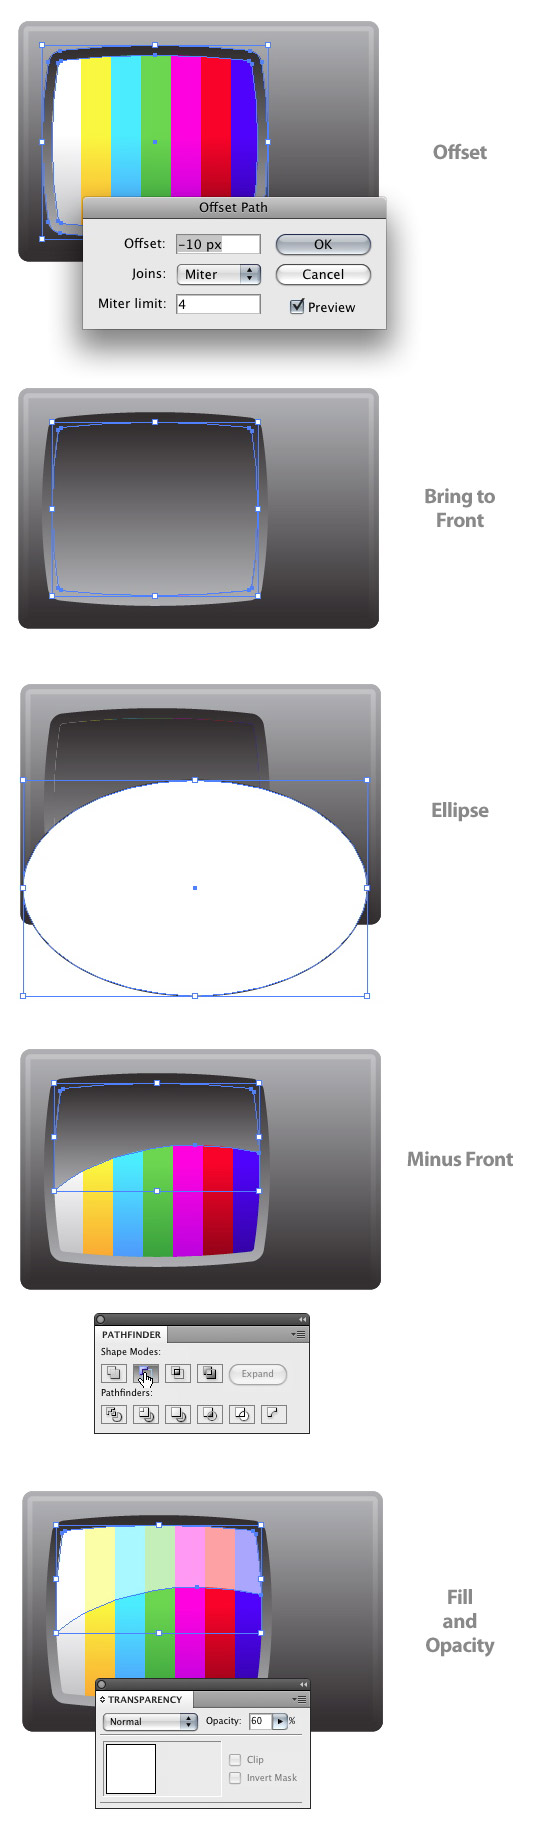
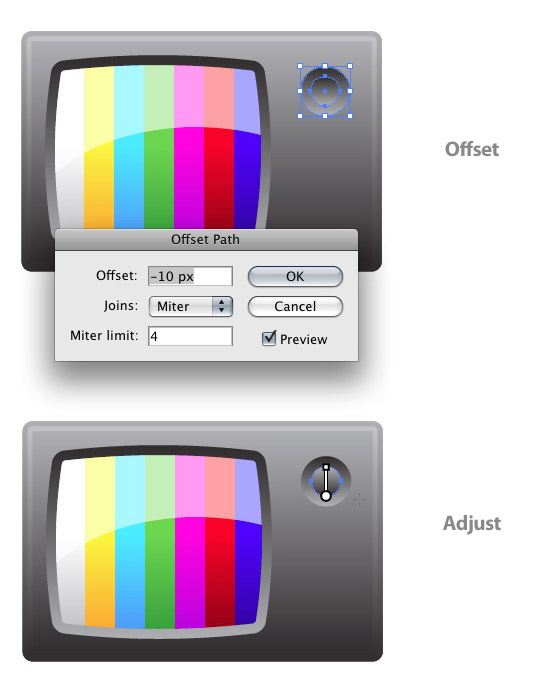
Select the original screen shape, go , and change the Offset to -10. Next bring the offset shape to the front by going Object > Arrange > Bring to Front (Command + Shift + ])
الخطوة 12حدد الشكل الأصلي الشاشة ، انتقل الى Object > Path > Offset
، وتغيير الى Offset to -10
. بعدها الى رفع شكل تعويض للجبهة عن طريق الذهاب الى Object > Arrange > Bring to Front (Command + Shift
)
Step 13
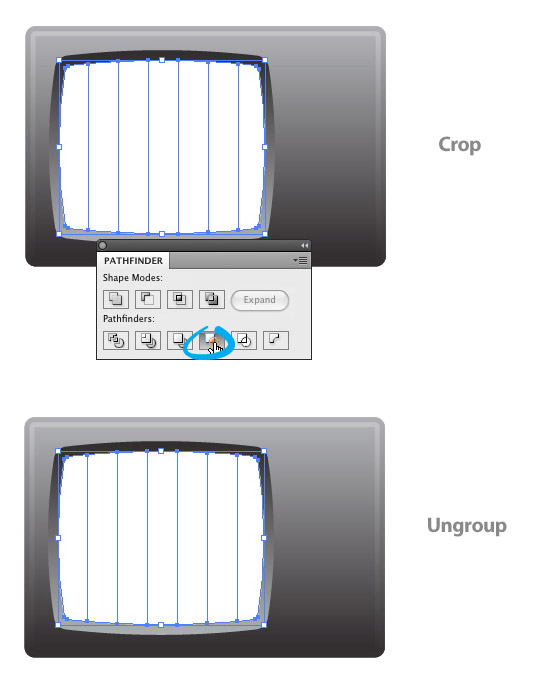
Select the offset shape, the seven rectangles, and press the Crop button in the Pathfinder panel. Next, ungroup the objects.
الخطوة 13حدد شكل offset shape
، والمستطيلات السبعة ، ثم اضغط على زر في لوحةPathfinder panel
. وبعد ذلك ، فك تجميع الكائنات.ungroup the objects.
Step 14
Select all the cropped rectangles and fill them with a Linear Gradient. With the Gradient tool (G), click and drag from the center of the rectangles to the bottom. Next, select the farthest left rectangle, change the first Color Stop white, and the second to a light grey. For the second rectangle change the first Color Stop in the gradient to a yellow color and the second to a darker shade of yellow. Repeat chagning the Color Stops in the Gradient panel for each rectangle with different colors, always making the second Color Stop in the gradient a darker shade of the original color.
الخطوة 14حدد كافة المستطيلات اقتصاص منهم وملء مع Linear Gradient
. مع أداة التدرج Gradient tool (G
، انقر واسحب من وسط المستطيلات إلى أسفل. ثم ، حدد أقصى اليسار المستطيل ، وتغيير لون إيقاف الأول بيضاء ، والثانية إلى رمادي فاتح. لالمستطيل الثاني تغيير لون إيقاف أول في الانحدار إلى لون أصفر والثاني على أكثر قتامة الظل الأصفر. كرر chagning يتوقف لون في لوحة تدرج عن كل مستطيل بألوان مختلفة ، مما يجعل دائما الثانية لون إيقاف في الانحدار أكثر قتامة الظل من اللون الأصلي
Step 15
Select the original screen shape, Offset it by -10 px, and bring it to the front. Next, draw an ellipse with the Ellipse tool (L) halfway down the offset shape. Make the ellipse wider than it is tall. Select the offset shape and ellipse and press the Minus Front button in the Pathfinder panel. Now, change the fill of the new shape to white and set the Opacity to 60 in the Transparency panel.
الخطوة 15حدد الشكل الأصلي الشاشة original screen shape,
، وOffset
_ 10 px
، وجعله إلى الأمام. وبعد ذلك ، رسم القطع الناقص مع أداة Ellipse tool (L)
(إلى اليسار) في منتصف الطريق إلى أسفل على شكل تعويض offset shape
. جعل القطع الناقص على نطاق أوسع مما هو عليه من طول. حددoffset shape
وellipse
واضغط على زرMinus Front button
في لوحة Pathfinder panel.
. الآن ، تغيير تعبئة الشكل الجديد إلى الأبيض ومجموعة من الابهام الى 60 في لوحة الشفافية.Transparency panel
Step 16
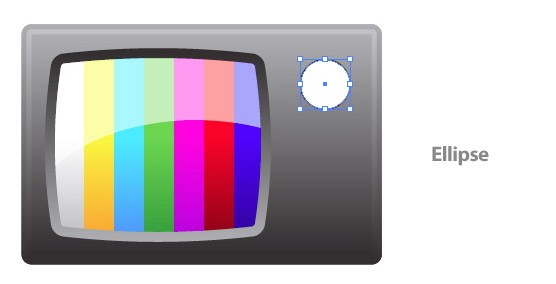
Now that we are done with the screen, we can take a look at some of the other television elements. To start, use the Ellipse tool (L) and create a 50 px by 50 px ellipse to the right of the screen.
الخطوة 16والآن بعد أن تم الانتهاء من الشاشة ، ويمكننا أن نلقي نظرة على بعض العناصر التلفزيونية الأخرى. لبدء ، استخدم أداةEllipse tool (L)
) وإنشاء 50 px by 50 px ellipse
إلى يمين الشاشة.
Step 17
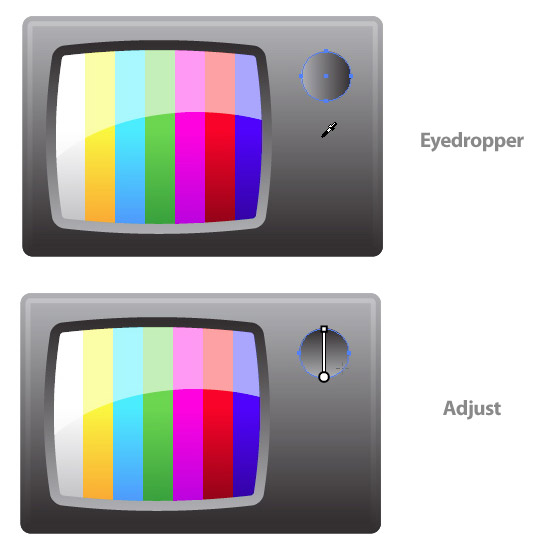
With the ellipse selected, use the Eyedropper tool (I) and sample the main television shape’s gradient. Next, adjust the gradient from bottom to top so the lighter part of the gradient is at the bottom of the ellipse.
الخطوة 17مع تحديد القطع الناقص ، استخدم أداة الشافطة (الأول) ، ونموذج الانحدار الشكل التلفزيون الرئيسي. المقبل ، وضبط التدرج من أسفل إلى أعلى حتى أخف جزءا من التدرج هو في الجزء السفلي من القطع الناقص.
Step 18
With the ellipse selected, offset the path by -10 px and adjust the gradient from top to bottom so the lighter part of the gradient is at the top of the offset ellipse.
الخطوة 18
مع تحديدellipse
، ويقابل ذلك المسار من قبل 10 px
وضبط الانحدار من أعلى إلى أسفل حتى أخف جزءا من التدرج هو في الجزء العلوي من offset ellipse
Step 19
With the Rounded Rectangle tool, draw a shape in the middle of the last offset ellipse. Fill the new shape with a linear gradient with the first Color Stop a light grey color and the second Color Stop a Grey color. Next adjust the gradient so the light part of the gradient is at the top of the shape
الخطوة 19
مع أداة Rounded Rectangle tool
، رسم شكل في وسط offset ellipse.
الماضي. ملء الشكل الجديد مع الانحدار الخطيlinear gradient
مع first Color Stop
لون رمادي فاتحlight grey color
والثاني لون إيقاف لون رمادي.بعدها ضبط الانحدارgradient
حتى الجزء ضوء التدرج هو في الجزء العلوي من الشكل.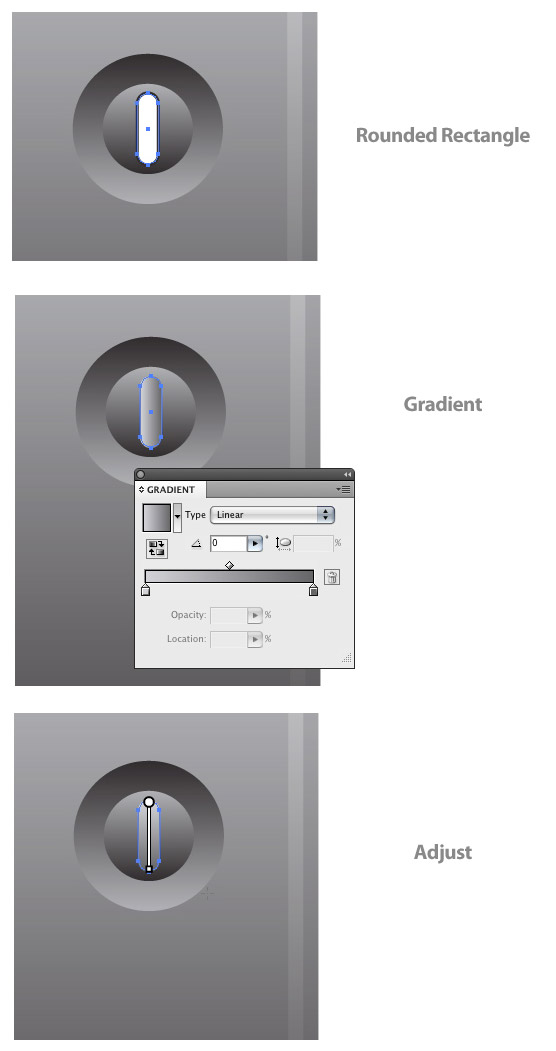
Step 20
Select the original ellipse, the offset ellipse, and the rounded rectangle. Hold down the Shift and Command key (Ctrl key for PC) and drag a copy of the selected shapes below the original.
الخطوة 20
حدد original ellipse
، وoffset ellipse
، وrounded rectangle
. اضغط على زر Shiftفي الكيبورد
باستمرار الضغط عليه قم بالضغط على (مفتاح (Ctrl
على حاسبك الشخصيPC
) ، وسحب نسخة copy
من الأشكال المحددة أدناه الأصلي.

Step 21
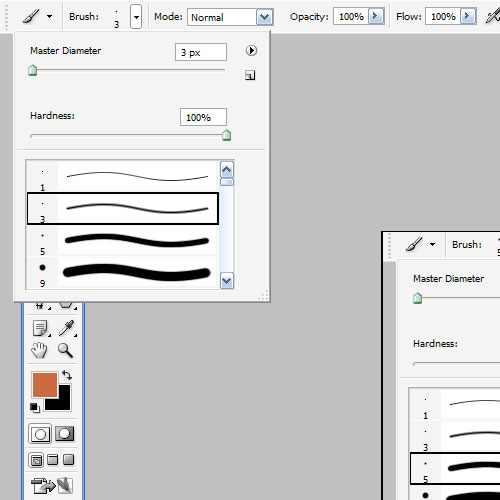
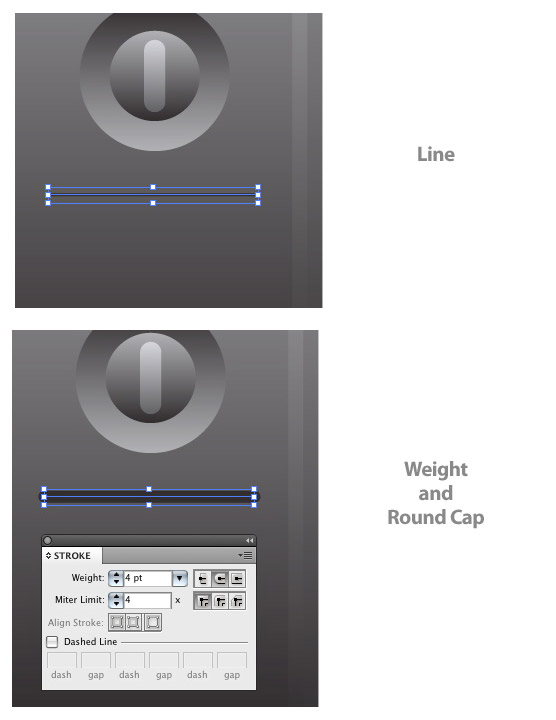
With the Line Segment tool, draw a 70 px wide stroke, just below the knobs that were just created. In the Stoke panel, change the Weight to 4, and press the Round Cap icon
الخطوة 21
مع أداة Line Segment tool
، رسمdraw a 70 px wide stroke
، أقل بقليل من المقابض التي تم إنشاؤها فقط. في لوحة Stoke pane
، وتغيير وزن إلى 4 ، ثم اضغط على أيقونة Round Cap
Step 22
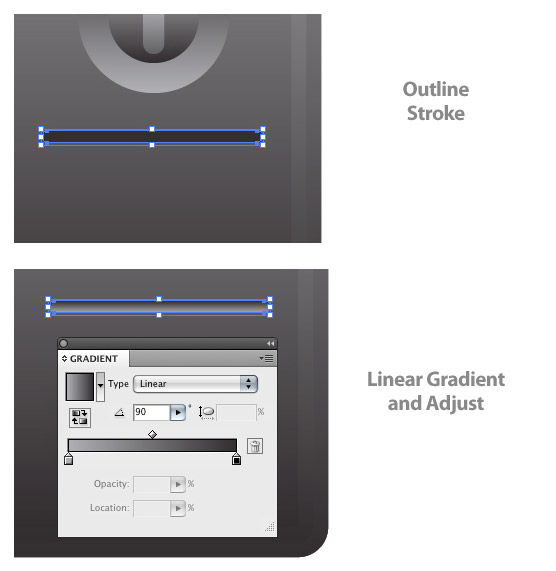
With the line select go Object > Path > Outline Stroke. Next fill the outlined stroke with the same gradient and gradient adjustments as the knobs first ellipse.
الخطوة 22
مع تحديد line select
الذهاب الى Object > Path > Outline Stroke
. ملءoutlined stroke
مع التدرج نفسه والتسويات gradient
وellipse
أول knobs
Step 23
With the outlined stroke selected, go Effect > Distort and Transform > Transform, change the copies to 6, and the Vertical Move to -9 px. Next go Object > Expand Appearance.
الخطوة 23
مع outlined stroke selected,
، انتقل الى Effect > Distort and Transform > Transform
،و تغيير النسخ copies
إلى 6 ، ونقل إلى Vertical
-9 px.
. التالي اذهب الى Object > Expand Appearance.
Step 24
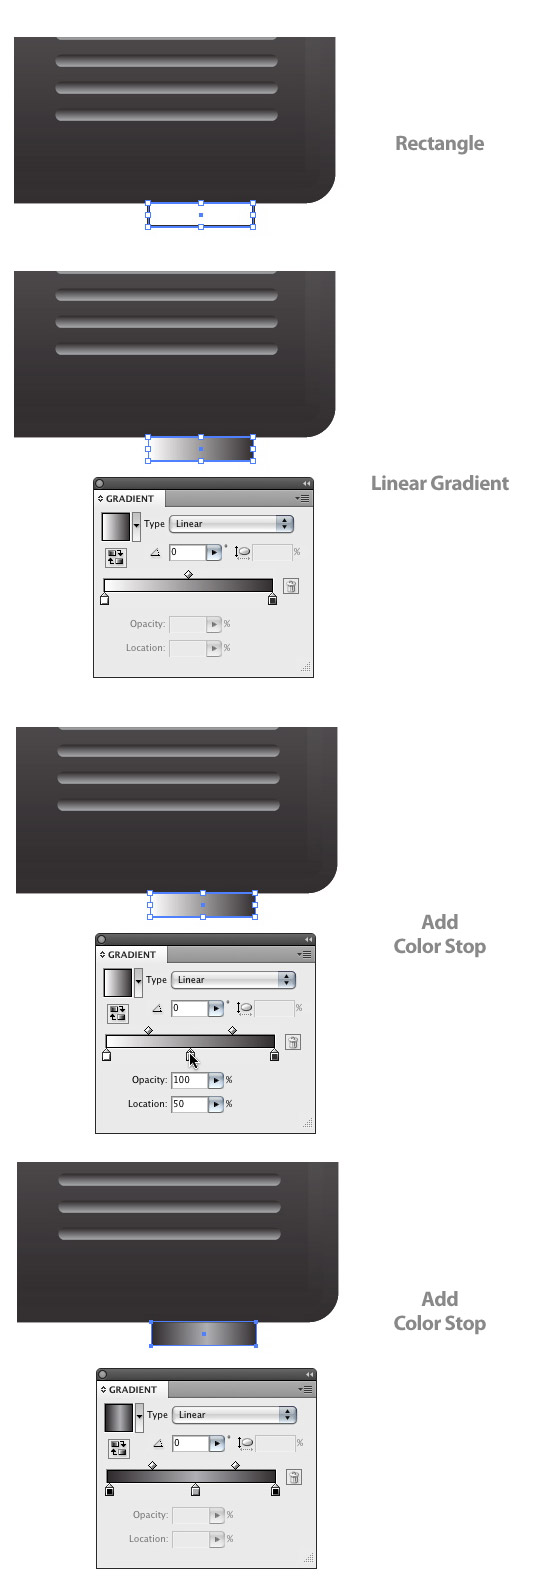
Create a 35 px by 8 px rectangle and place it just bellow the right side of the main television shape and fill the rectangle withe a Linear Gradient from the Gradient panel. For this gradient we are going to add another Color Stop, giving us a total of three. To add a Color Stop to the gradient, click right below the Gradient Slider in the Gradient Panel. Change the first Color Stop to a dark grey, the second to a grey, and the last to the same dark grey as the first one.
الخطوة 24
إنشاء 35 px by 8 px rectangle
ووضعه خوار فقط في الجانب الأيمن من الشكل التلفزيون الرئيسية وملء المستطيل مع Linear Gradient
من لوحة التدرج Gradient panel
. لهذا الانحدارgradient
نحن نذهب لإضافة لون آخر Color Stop
، بما يتيح لنا ما مجموعه ثلاثة. لإضافة لون لإيقاف الانحدارColor Stop
، واضغط كليك ايمن فوق شريط التمرير دون تدرج في لوحة التدرج. تغيير لون إيقاف الأول إلى الرمادي الداكن dark grey
، والثاني إلى اللون الرمادي ، وآخر من اللون الرمادي الداكن في نفس واحد 1.
Step 25
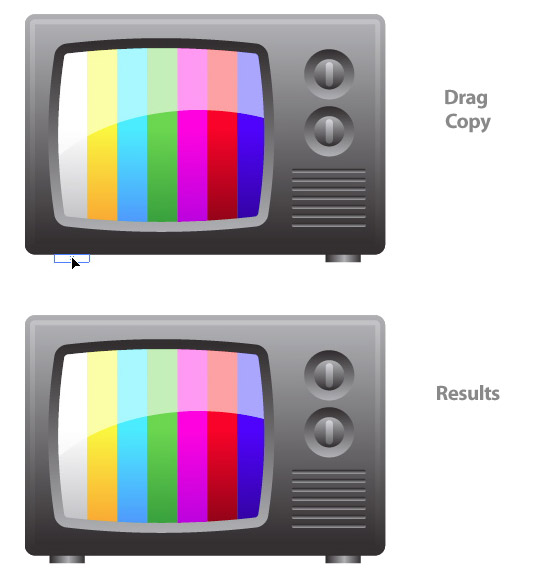
With the new rectangle selected, hold down the Shift and Command key (Ctrl key for PC) and drag a copy of the rectangle to the left side of the television.
الخطوة 25
مع المستطيل الجديد المحدد ،اضغط باستمرارShift
و Command keyو(Ctrl key for PC
) ، وسحب نسخة من المستطيل إلى الجانب الأيسر من التلفزيون.
Step 26
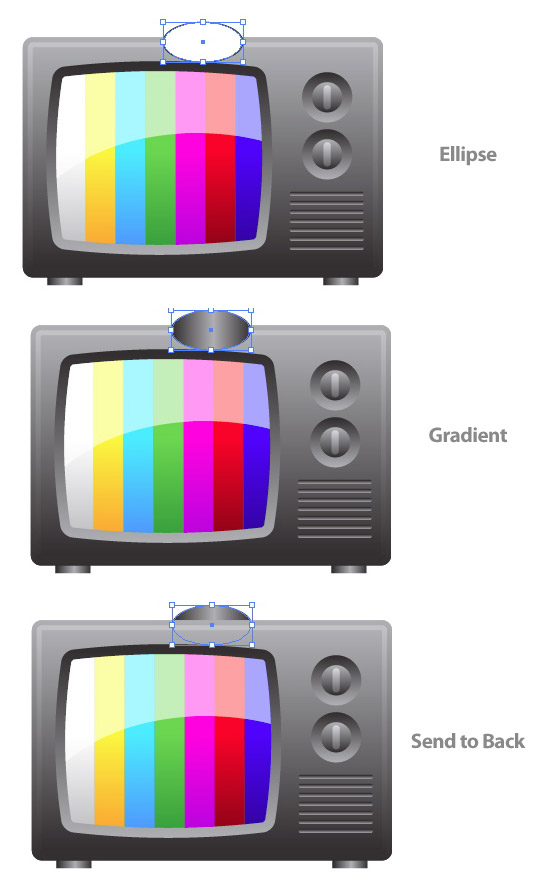
Draw a 80 px wide by 40 px tall ellipse and place over the top of the television. Fill the ellipse with the same gradient as the previous rectangles. Next, go Object > Arrange > Send to Back (Command + Shift + [).
الخطوة 26
رسم 80Draw a 80 px wide by 40 px tall ellipse
ووضع على رأس التلفزيون. ملءellipse
مع التدرج نفس المستطيلات السابقة. بعدها ، انتقل الى Object > Arrange > Send
إلى عودة (Command + Shift
.
Step 27
Create a 90 px wide by 4 px tall rectangle and fill it with the same linear gradient as the previous ellipse. With the rectangle selected, use the Selection tool (V), hold down shift, and rotate the rectangle 45 edegres. Send the rectangle to the back (Command + Shift + [) and place on the left side of the previous ellipse.
الخطوة 27
إنشاء90 px wide by 4 px tall rectangle
وملء مع الانحدار الخطي نفس linear gradient
السابقة. مع المستطيل المحدد ، استخدم أداة التحديدSelection tool (V),
،والضغط على shift,
، وتدوير 45 edegres.
درجة المستطيل. إرسال المستطيل إلى الخلف (Command + Shift +
) وضع على الجانب الأيسر من ellipse
السابقة.
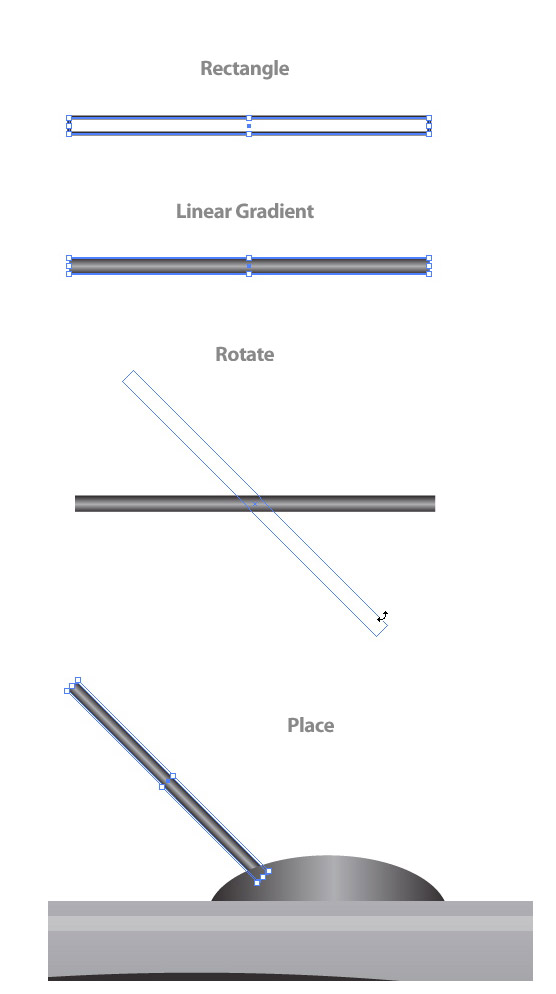
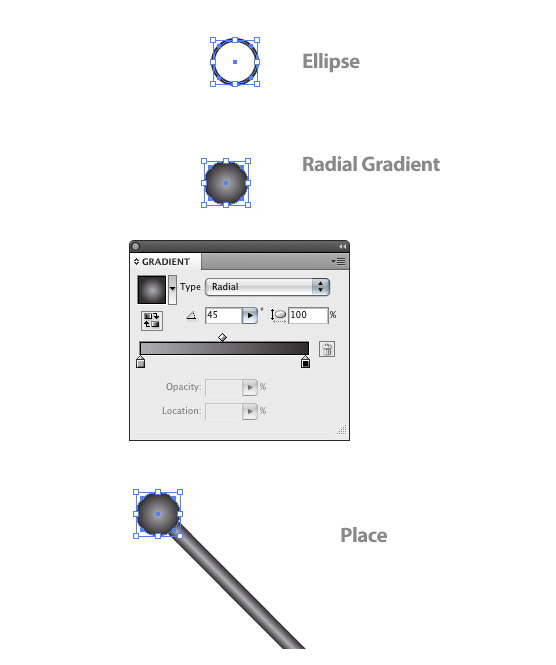
Step 28
Draw an 11 px by 11px ellipse and fill it with a Radial gradient from the Gradient panel. Change the first Color Stop to grey and the second Color Stop to a dark grey. Place the ellipse over the top of the previous rectangle.
الخطوة 28
رسم Draw an 11 px by 11px ellipse
وملء مع انها متدرجة شعاعيRadial gradient
من لوحة متدرجةGradient panel
. تغيير لون أول إيقاف لرمادي Color Stop
والثاني إيقاف اللون الرمادي الداكن ل. مكانellipse
على الجزء العلوي من المستطيل السابق.
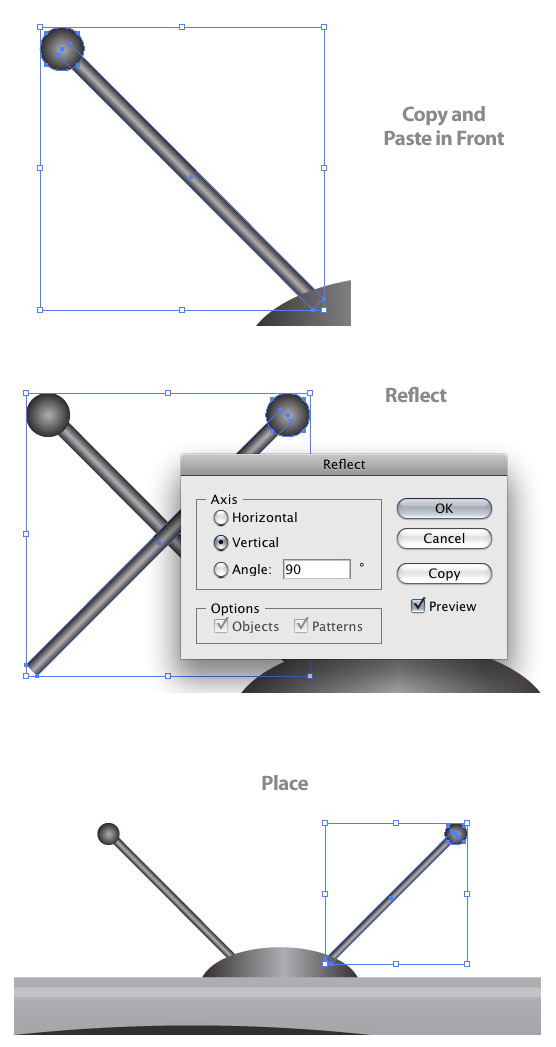
Step 29
Select the ellipse and rectangle(
Resolutions and the form of an antenna) and Copy (Command + C) and Paste in Front (Command + F). With the copies selected, go
Object> Transform> reflect, check the Vertical radial button in the Reflect dialog, and press OK. Next move the antenna shapes to the right side of the above ellipse.
الخطوة 29
حدد ellipse
والمستطيل (Resolutions و antenna shapes
) ونسخ (Command + C
ولصقها في جبهة ((Command + F
). مع النسخ المختارة ، انتقل Object> Transform> reflect ، للتحقق من الزر عمودي شعاعي في اReflect dialog
واضغط موافق. الخطوة التالية antenna shapes
إلى الجانب الأيمن منellipse
أعلاه.
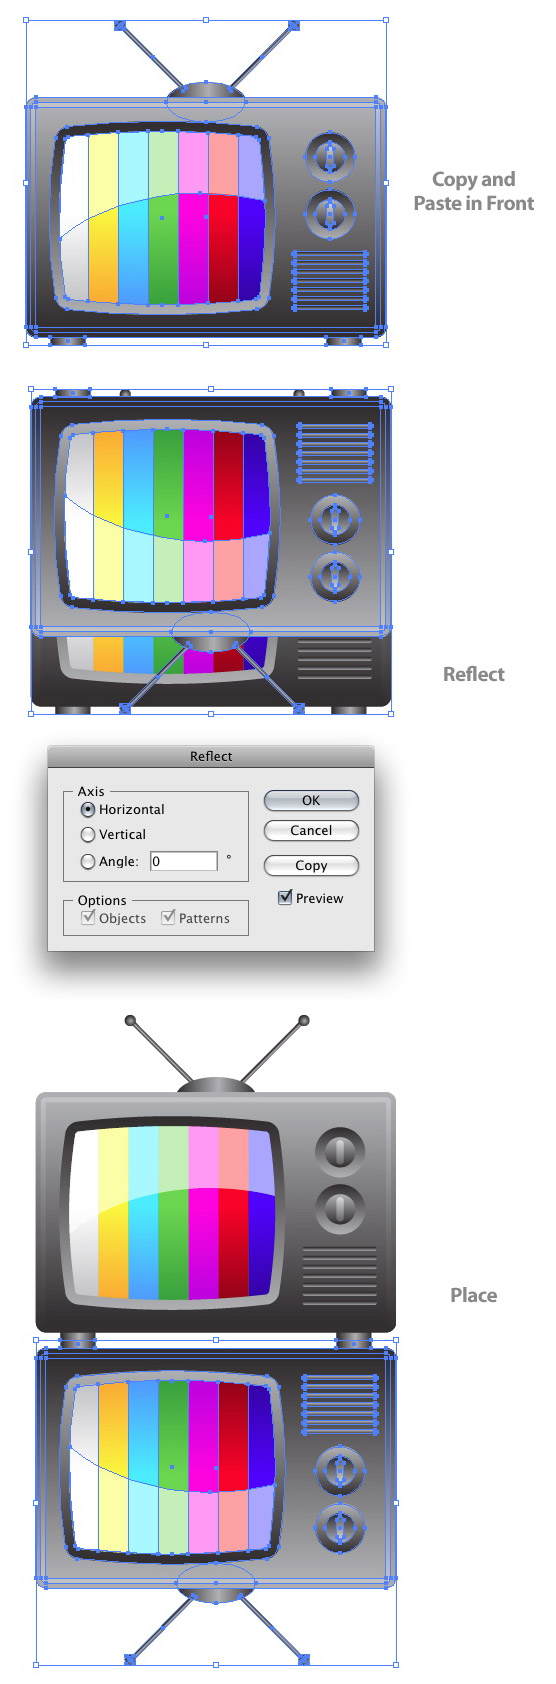
Step 30
Select all the television artwork and Copy (Command + C) and Paste in Front (Command + F). With the copies selected, go Object > Transform > Reflect, check to Horizontal button in the Reflect dialog, and move the reflected copies so the television foots line up.
الخطوة 30
حدد كافة الأعمال الفنية التلفزيونية ونسخ (Command + C
) ولصقها في جبهة (Command + F
). مع النسخ المختارة copies selected
، انتقل الى Object > Transform > Reflect
، تحقق لزر أفقي فيReflect dialog
، ونقل reflected copies
ذلك الخط حتى يمشي على الأقدام التلفزيون.
Step 31
Create a rectangle that cover the reflected television copy. Fill the rectangle with a linear gradient, change the first stop to white and the second stop to black. Adjust the gradient by clicking from the top of the rectangle to the bottom. Next select the rectangle and copied television shapes, click the pop-up menu in the Transparency panel, and choose Make Opacity Mask. While still in the transparency panel, change the opacity of the mask to 40 percent.
الخطوة 31
إنشاء مستطيل التي تغطي نسخة التلفزيون المنعكسة . تعبئة المستطيل مع linear gradient
، وتغيير المحطة الأولى(first stop)
إلى الأبيض والأسود إلى المحطة الثانية. ضبط التدرج بالنقر من الجزء العلوي من المستطيل إلى أسفل..بعدها حدد المستطيل والأشكال نسخ التلفزيون ، انقر فوق القائمة المنبثقة pop-up menu
في لوحة الشفافيةTransparency panel,
، وجعل اختيار Opacity Mask
. في حين لا تزال في لوحةTransparency panel
، وقم بتغيير عتامة القناع إلى 40 في المئة.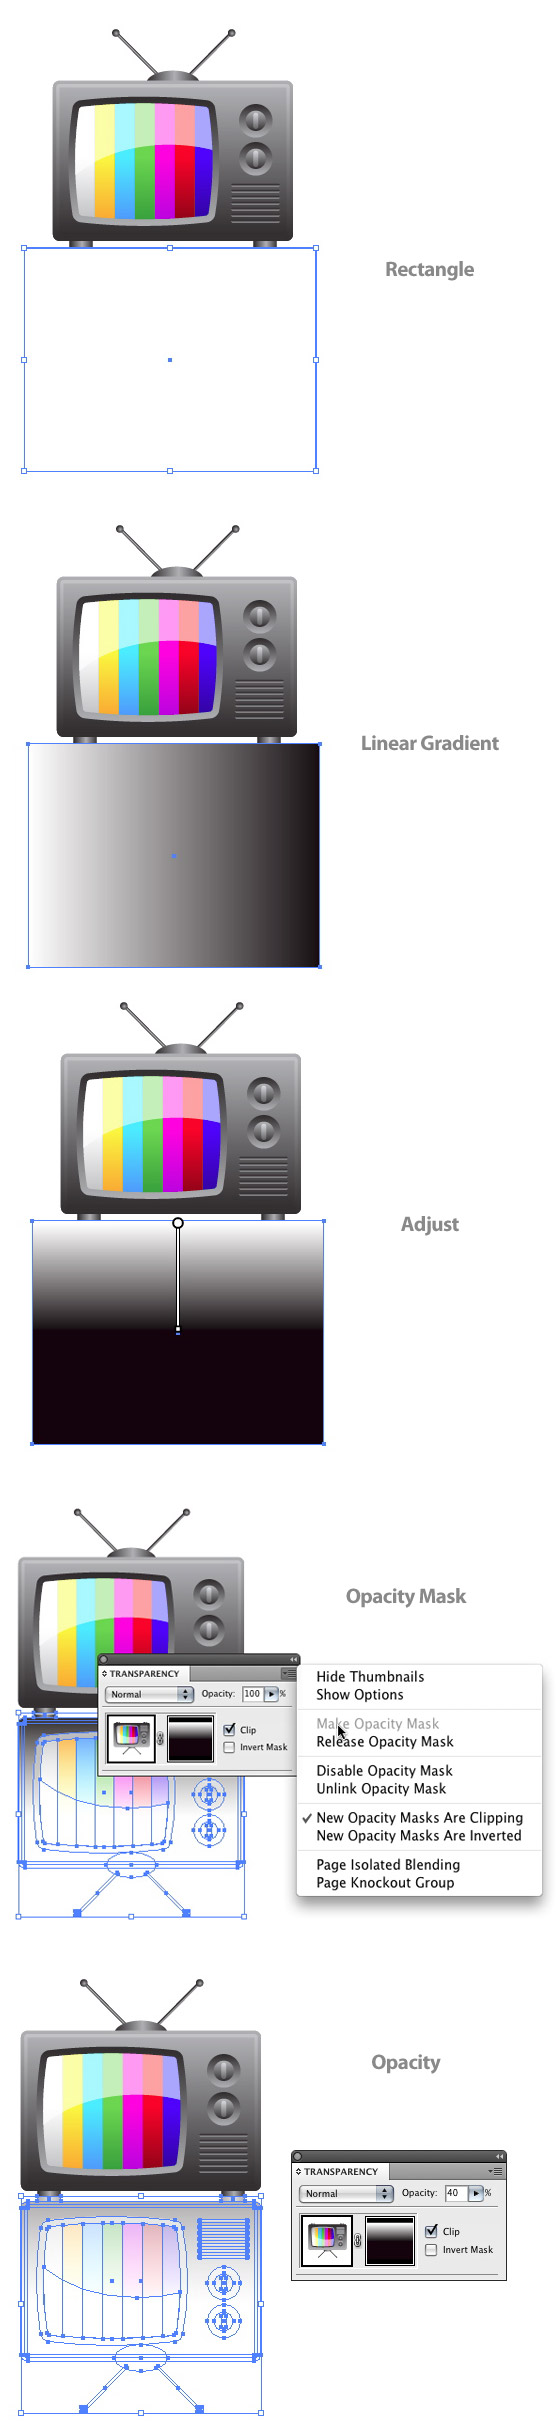
Step 32
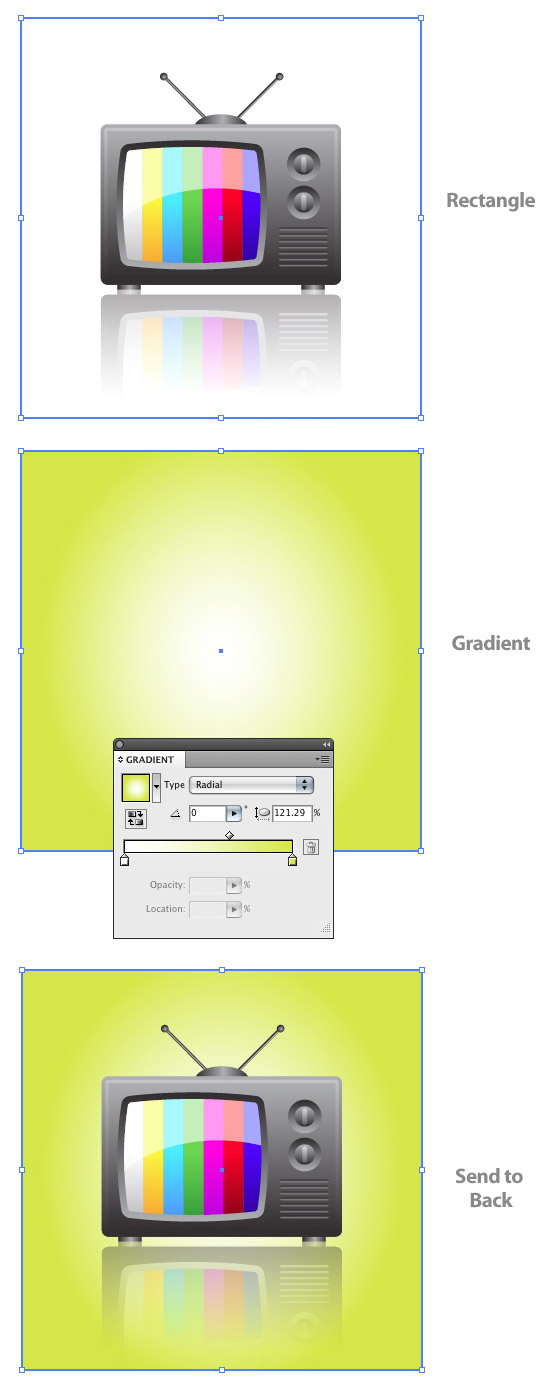
Create a rectangle the size of your document, fill it with a Radial Gradient, change the first Color Stop to a light green, the second Color Stop a green, and place it behind all the television artwork. All done!
الخطوة 32
إنشاء مستطيل حجم العمل او المستند وملئه مع متدرجة شعاعي ، تغيير لون أول إيقاف لضوء أخضر ، والثاني وقف لون أخضر ، ووضعه وراء جميع الأعمال الفنية في التلفزيون. جميع القيام به!
انتهى الدرس ارجو ان ينال الاعجاب
خالص احترامي
مدونة مواهب التصميم
برامج فوتوشوب-دروس-فرش-ادوات-اضافات-خطوط : منتدى الفوتوشوب يهتم بكل ما هو جديد وهام فى عالم الفوتوشوب من برامج للفوتوشوب واستايلات فوتوشوب والخطوط وكذلك فرشتحميل برنامج فوتوشوب - تحميل برنامج الفوتوشوب - تحميل مباشر _باترن _فوتوشوب اون لاين_تحميل جيلتر بأشكال كثيرة_استايلات_اشكال_بطاقات تصميم_Adobe PhotoShop
تعلم الرسم بيدك _الرسم في قلم الرصاص _اساسيات الرسم_عشرين ملف مفتوح للسويتش ماكس_صور وضعت الجيلتر عليها _صور من تصميمي _ايقونات تفيد في التصميم اضهر ابداعك
_وبرنامج السويتش ماكس والفلاشات_تحميل ملفات مفتوحة برابط مباشر_دروس السويتش ماكس _مواهب التصميم_ايقونات ثريدي _ايقونات ثري دي تفيد في التصميم _مكتبة الجيلتر